
The Ultimate Guide to Grilling Fish Without Sticking: 5 Steps to Perfect Results
The allure of grilled fish is undeniable—that smoky char, the perfectly cooked, flaky interior, and the satisfaction of cooking a healthy, delicious meal outdoors. But for many, the dream quickly turns into a nightmare of stuck-on fish, broken fillets, and a grill grate that’s impossible to clean. I’ve been there, and I’ve scraped my fair share of salmon skin off the grates in frustration.
Table of Contents
The good news is that grilling fish without it sticking is not a matter of luck; it’s a matter of technique. After countless trials in my backyard, I’ve perfected a foolproof method that guarantees your fish will lift cleanly from the grill every single time. This guide will walk you through the five non-negotiable rules for no-stick success.
This technique is a cornerstone of outdoor cooking. For a complete overview of all seafood cooking methods, be sure to explore our foundational pillar page, The Ultimate Guide to Cooking Seafood
Why Grill Fish? The Flavor Advantage
Grilling uses intense, direct heat from below, which is perfect for creating a delicious char and imparting a smoky flavor that you simply can’t replicate indoors. This high-heat method is ideal for firm, meaty fish that can hold their shape and benefit from the robust flavor development.
The Foundation: Choosing the Best Fish for the Grill
Your success starts with selecting the right kind of fish. While you can grill almost any fish with the right tools, some are naturally better suited for the high heat and open grates of a grill.
- Firm & Meaty Fish: These are the champions of the grill. Their dense, steak-like texture means they won’t fall apart when you flip them. Think Swordfish, Tuna, and Mahi-Mahi.
- Oily & Rich Fish: The high fat content in these fish provides a natural buffer against drying out, keeping them moist and succulent. This category includes Salmon, Mackerel, and Arctic Char.
The 5 Non-Negotiable Rules for No-Stick Grilling
Forget everything else you’ve heard. If you follow these five rules diligently, your fish will not stick.
Rule #1: Start with a Super Clean Grill
This is the most overlooked but most critical step. Leftover food particles and carbon buildup from your last barbecue are the number one cause of sticking. Before you even think about lighting the grill, you must scrub the grates thoroughly with a stiff wire brush until they are smooth and free of any debris.
Rule #2: Get the Grill Extremely Hot
A hot grill is a non-stick grill. High heat instantly sears the surface of the fish, creating a crust that allows it to release cleanly from the metal grates. Preheat your grill on high for at least 10-15 minutes with the lid closed. You want the grates to be screaming hot before the fish ever touches them.
Rule #3: Oil Everything (The Right Way)
This is a two-part process. First, pat your fish fillets completely dry, then brush them lightly on all sides with a high-smoke-point oil like canola, grapeseed, or avocado oil. Second, just before you place the fish on the grill, use tongs to wipe the hot grates with a paper towel soaked in the same oil. This creates a double layer of non-stick protection.
Rule #4: The Fish Must Be Dry
Moisture is the enemy of a good sear and the best friend of sticking. Even if you’re using a marinade, be sure to pat the surface of the fish completely dry with paper towels right before oiling it. A dry surface allows the fish to sear, not steam.
Rule #5: Patience is a Virtue (Don’t Flip Too Soon!)
Once you place the fish on the hot, oiled grates, leave it alone. The fish will tell you when it’s ready to be flipped. After a few minutes, the proteins will have cooked and formed a firm crust, causing the fish to release naturally from the grates. If you try to lift it and it feels stuck, it’s not ready. Give it another 30-60 seconds and try again. Forcing it is what causes it to tear.
Step-by-Step: Putting It All Together
- Prep: Choose a firm, meaty fish. If using a marinade, apply it, but be sure to wipe off any excess and pat the fish completely dry before cooking.
- Heat: Clean your grill grates thoroughly. Preheat the grill to high heat (400-450°F or 200-230°C).
- Oil: Brush the dry fish with a high-smoke-point oil. Just before cooking, wipe the hot grates with an oil-soaked paper towel.
- Grill: Place the fish on the grill. If it has skin, start skin-side down. Let it cook undisturbed for 4-6 minutes per side, depending on thickness.
- Flip: When the fish releases easily, flip it once and finish cooking.
- Serve: Remove from the grill and serve immediately.
For more in-depth tips on managing your fire and mastering different heat zones, check the Grilling Guide
Helpful Tools for Grilling Fish
While not strictly necessary, a grill basket can be a lifesaver, especially for more delicate or smaller pieces of fish that might otherwise fall through the grates. A long, thin fish spatula is also invaluable for getting under the fillets cleanly without breaking them.
Frequently Asked Questions (FAQ)
How long should I grill fish?
A good guideline is the “10-minute rule”: cook for 10 minutes per inch of thickness, flipping halfway through. For a 1-inch thick salmon fillet, that’s about 5 minutes per side.
Should I grill fish with the skin on or off?
Always grill with the skin on if possible. The skin provides a protective layer that helps hold the delicate flesh together and prevents it from drying out. Plus, crispy grilled fish skin is delicious!
Can I use foil to grill fish?
You can, but you won’t get the same char and smoky flavor. Cooking fish in a foil packet is closer to steaming. 2 If you’re worried about sticking, the five rules above are a much better solution.
By following this technique-driven approach, you can banish the fear of grilling fish forever. Embrace the heat, be patient, and get ready to enjoy perfectly grilled, non-stuck fish every time.
Have you tried this method? Share your success stories or ask any lingering questions in the comments below. Your feedback helps our entire community of home cooks!
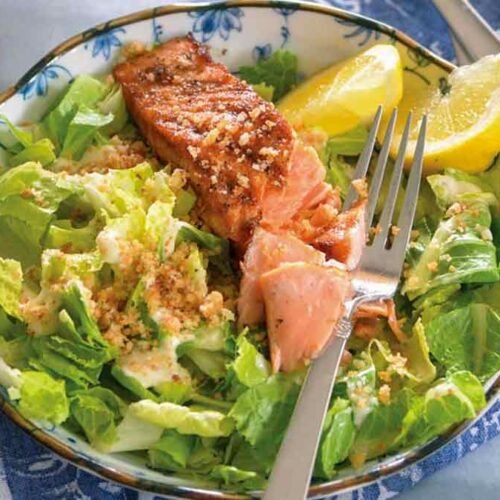
Grilled Salmon Caesar Salad with Parmesan Garlic Bread Crumbs
Equipment
- Mdium Sause Pan
- Grill
- Brush
Ingredients
CAESAR DRESSING
- 2 garlic cloves
- 6 anchovy fillets
- 1 teaspoon Worcestershire sauce
- 1 teaspoon Dijon mustard
- 2 tablespoons freshly squeezed lemon juice
- ½ teaspoon freshly ground black pepper
- 2 large egg yolks at room temperature
- ½ cup extra-virgin olive oil
- Salt
PARMESAN GARLIC BREAD CRUMBS
- 1 tablespoon extra-virgin olive oil
- ¼ cup bread crumbs
- 1 garlic clove minced
- ¼ cup grated Parmesan
FISH
- 1½ pounds salmon skin on, paper towel dried, cut into 4 pieces and removed from refrigerator at least 15 minutes prior to cooking
- 1 to 2 tablespoons high-heat oil
- Salt and freshly ground black pepper
- 1 large head romaine lettuce washed, dried, and chopped
- Lemon wedges for garnish
Instructions
- Make the dressing: Combine the garlic, anchovies, Worcestershire, Dijon, lemon juice, pepper, egg yolks, and olive oil in a food processor or blender. Blend until smooth and creamy. Add water to thin, if desired. Add salt to taste, if desired.
- Make the bread crumbs: Heat the olive oil in a medium sauté pan over medium heat. Add the bread crumbs and slowly let them become golden.
- Then, stir in the garlic and let the bread crumbs toast just a bit longer, about 30 seconds. Don’t let the garlic get too browned or it will be bitter.
- Remove the pan from the heat and then pour the bread crumbs into a bowl. When the bread crumbs cool, stir in grated Parmesan and set aside.
- Next, prepare the fish: Preheat a grill to 425°F. Be sure your grill grates are as clean as possible. This will help prevent sticking.
- Brush each salmon fillet with high-heat oil on all sides and season with a sprinkle of salt and pepper.
- Place the salmon pieces, flesh side down, diagonally on the grill, this will also help the fish flip easier. Close the lid and let salmon cook for 5 to 7 minutes, checking on the fish every few minutes.
- Then, using your tongs, try to ease the fish up off the grill grates. If they don’t budge, wait 30 seconds longer, or as needed. Once the fish come up off the grill easily, flip the fish to be skin side down and cook for another 3 to 4 minutes, until the fish are done. Remember, most fish cook through in about 10 minutes for every inch of thickness. The fish should be opaque and flake with a fork.
- Once the fish are done, transfer to a platter. The fish will usually slide right off the skin, leaving the skin on the grill. However, if the skin comes off the grate with the fish, you can either leave it on, or remove it from the fish.
- Place the chopped lettuce in a large bowl and toss with a little of the dressing. Divide the dressed lettuce among four plates and top with a tablespoon or more of the bread crumbs. Then, place a fillet of grilled salmon over each salad. Garnish with lemon wedges and serve with the remaining dressing and bread crumbs.