The Ultimate Guide to Baking: From Ancient Art to Modern Science
There’s a unique kind of magic that happens when you slide a pan into a warm oven. It’s in the air, a comforting aroma of melting butter, caramelizing sugar, or rising bread that fills a home and speaks a universal language of comfort and care.
Baking is more than just a method of cooking; it’s a process of transformation. It turns humble ingredients—flour, sugar, eggs, and butter—into everything from crusty, rustic loaves and elaborate pastries to simple, soul-satisfying cookies.
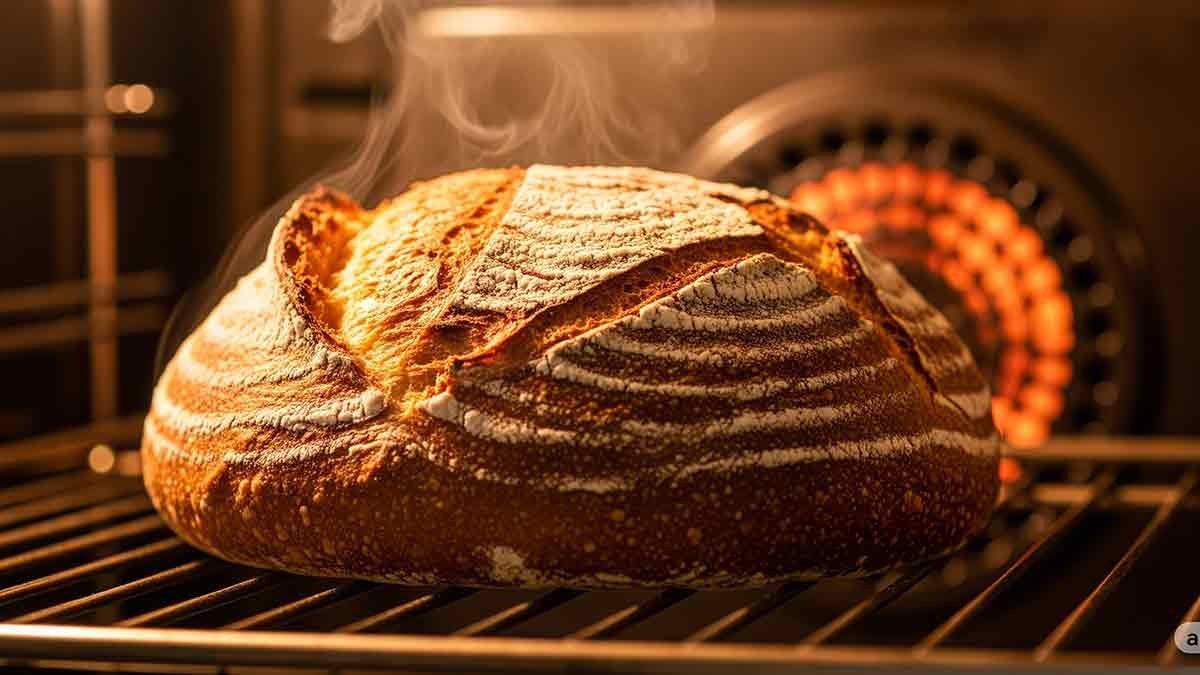
At its core, baking is a method of preparing food that uses prolonged dry heat, typically in an enclosed space like an oven. As this gentle, ambient heat travels from the surface of batters and doughs toward their center, it works a scientific marvel, creating a firm, dry crust while setting a soft, tender interior.
This article is your complete guide to that magical transformation. We will embark on a journey that spans millennia, from the earliest bakers cooking paste on hot stones to the Roman artisans who perfected bread and the modern chemists who unraveled the science behind a perfect rise.
Whether you are a home cook just starting, a professional chef honing your craft, or a curious foodie, you will find the knowledge here to bake with confidence. We will explore the essential tools, master fundamental techniques, troubleshoot common failures, and even dive into the specific art of baking fish. Prepare to unlock the secrets of the oven and discover that the magic of baking is a skill anyone can learn.
Table of Contents
A Journey Through Time: The Rich History of Baking
The story of baking is deeply intertwined with the story of human civilization itself. It’s a narrative that tracks our progress from basic survival to the development of agriculture, technology, and complex societies. What began as a necessity evolved into a respected profession, a symbol of social status, and finally, an accessible art form enjoyed in kitchens around the world.
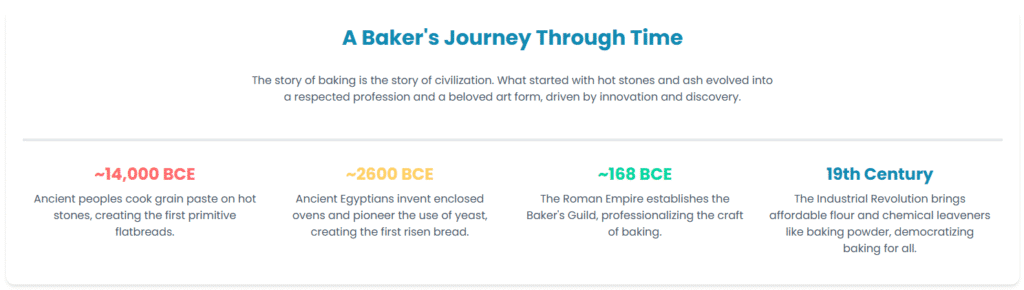
From Embers and Ash: The Dawn of Baking
The earliest forms of baking were born from necessity. Long before the invention of ovens, our ancient ancestors discovered that a paste made from mashing wild grass grains with water could be cooked on a hot, flat rock or directly in the embers of a fire. This resulted in the first rudimentary, unleavened flatbreads, a crucial step in making grains a digestible part of the human diet. This primitive method of using hot stones or ash to dry out a grain paste represents the very dawn of baking.
Archaeological evidence confirms this long history; in 2014, the world’s oldest known ovens were discovered in Croatia, dating back an astonishing 6,500 years.
The Rise of the Artisan: How the Egyptians and Romans Perfected the Craft
The first great leap in baking technology came from the Ancient Egyptians. Around 2600 BC, they not only invented the first enclosed ovens made of clay but also pioneered the use of yeast as a leavening agent. This discovery, likely an accidental byproduct of their beer-brewing activities, was revolutionary.
It allowed them to move beyond simple flatbreads to create the first light, risen loaves, transforming bread into a more palatable and digestible staple food. Bread became so central to their culture that it was offered as a major food to their gods, with some loaves shaped like animals for sacrificial ceremonies.
The craft was further refined and professionalized by the Roman Empire. The Romans developed large-scale milling and baking techniques to feed their vast population, establishing public bakeries and supplying bread to the people. Baking was held in such high regard that around 168 BC, they established the
Collegium Pistorum, or Baker’s Guild, recognizing bakers as skilled and respected artisans. This professionalization marked a significant shift, turning baking from a household chore into an organized and vital trade within urban centers.
Guilds, Spices, and Sugar: Baking Through the Middle Ages and Renaissance
After the fall of the Roman Empire, much of the sophisticated baking knowledge was preserved within monasteries, where monks baked bread for both sustenance and charity. In medieval Europe, bakeries began to emerge in towns, often regulated by guilds that set strict standards for quality and price.
During this time, the type of bread one ate was a clear indicator of social status. The wealthy enjoyed fine bread made from expensive wheat, while the poor consumed dense loaves made from rye and other coarse grains.
The Renaissance and the subsequent age of exploration brought profound changes. As global trade routes expanded, new and exotic ingredients like sugar and spices became more widely available, at least to the upper classes. This led to the creation of more decadent treats, including sweetened cakes, mincemeat pies, and gingerbread, moving baking beyond simple bread and into the realm of pastry and dessert.
The Modern Kitchen: How the Industrial Revolution Changed Everything
The 19th century marked the most dramatic transformation in the history of baking, one that brought the craft into the modern home. The Industrial Revolution ushered in a wave of innovations that democratized baking for the masses.
Efficient new milling processes made refined white flour more affordable and accessible. The development of semi-closed ovens provided better temperature control than the open-front hearths of the past.
Perhaps the most significant invention was chemical leavening. In the mid-19th century, the creation of baking powder provided a fast, reliable, and easy-to-use alternative to the slower, more temperamental yeast. This single innovation transformed the dense, yeast-based cakes of the past into the light, fluffy baked goods we know today, making it possible for home cooks with less time and expertise to achieve spectacular results.
This confluence of available ingredients and new technology firmly established baking as a beloved household activity and laid the foundation for the incredible diversity of baked goods we enjoy today.
The Baker’s Laboratory: Understanding the Science Behind the Magic
While cooking is often seen as an art, baking is fundamentally a science. The success of a cake, cookie, or loaf of bread hinges on a series of controlled chemical and physical reactions. A recipe is, in essence, a scientific formula. When you understand the “why” behind each ingredient and step, you move from simply following instructions to becoming an empowered creator who can troubleshoot, adapt, and invent with confidence. At the heart of many of these formulas is the careful management of a single protein: gluten.
The Core Reactions: What Happens in the Heat of the Oven
When you place your dough or batter in the oven, you are initiating a cascade of fascinating transformations. Three of the most important reactions are responsible for the flavors, colors, and textures we love.
- The Maillard Reaction: This is not simple browning; it’s a complex chemical reaction between amino acids (from proteins) and reducing sugars that occurs when food is heated. Typically proceeding rapidly between 280°F and 330°F (140°C to 165°C), the Maillard reaction is responsible for the savory, toasty, and deeply complex flavors and golden-brown color on the crust of bread, seared steaks, and cookies. It creates hundreds of new aroma and flavor compounds, making food vastly more appealing.
- Caramelization: Often confused with the Maillard reaction, caramelization is a distinct process. It is the browning of sugar itself when exposed to high heat. As sugar breaks down, it forms new compounds that have the characteristic nutty, buttery, and caramel flavors found in things like caramel sauce or the crispy edges of a cookie.
- Leavening: Leavening is what gives baked goods their light, airy structure. It’s the process of creating gas within a batter or dough. This can happen in two main ways. Chemical leaveners, like baking soda and baking powder, react with moisture and acid or heat to produce carbon dioxide (CO2) gas.Biological leaveners, like yeast, are living organisms that feed on sugars and ferment, releasing CO2 gas as a byproduct. In both cases, these gas bubbles become trapped within the dough’s structure, forcing it to expand and “rise”.
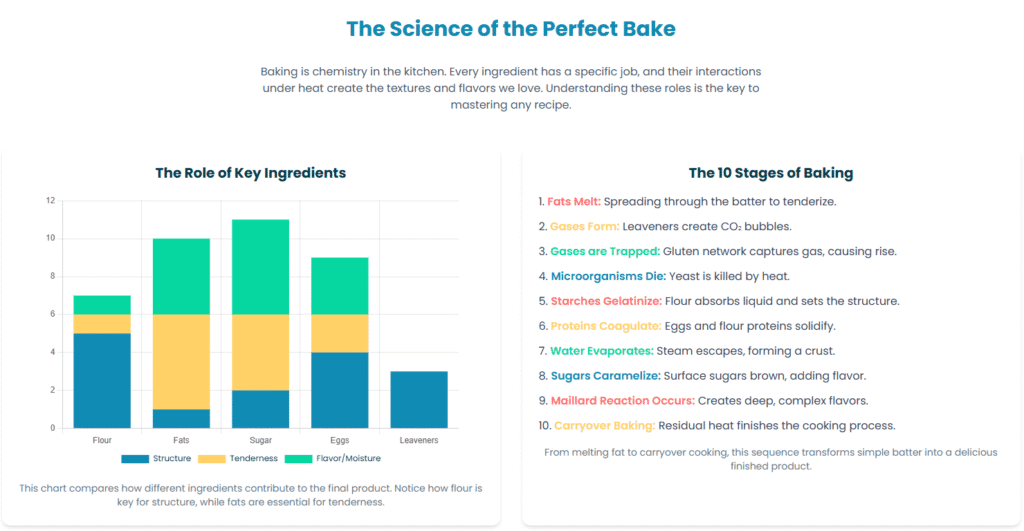
The Building Blocks: The Critical Role of Every Ingredient
Every ingredient in a baking recipe serves a specific chemical or physical purpose. Altering the ratio or omitting an ingredient can have dramatic effects on the final product. Understanding these roles is key to becoming a better baker. Many of the rules and techniques in baking, from using a specific type of flour to the admonition not to over-mix a cake batter, are designed to control the development of gluten—the protein network that gives baked goods their structure.
Table: The Baker’s Pantry: Understanding Your Ingredients
| Ingredient | Primary Function(s) | Scientific Role | Pro-Tip |
| Flour | Structure | The proteins in flour (glutenin and gliadin) combine with water to form an elastic network called gluten. This network traps the gas bubbles from leavening agents, providing the primary structure. The starch in flour gelatinizes (swells and sets) with heat, adding to this support. | The protein content of flour determines its gluten potential. Use high-protein bread flour for chewy, structured breads and low-protein cake flour for light, tender cakes. |
| Fats (Butter, Oil, Shortening) | Tenderness, Flavor, Leavening Aid, Moisture | Fat coats the flour proteins, physically shortening the gluten strands and preventing them from forming an overly tough network. This “shortening” effect creates tenderness. When creamed with sugar, the sharp sugar crystals create tiny air pockets in the solid fat, which aids in leavening. | The temperature of your fat matters. Cold butter is used in pastries like pie crusts and scones; it creates steam pockets as it melts, resulting in flaky layers. Room temperature butter is used in cakes to create a smooth, uniform batter that traps air evenly for a fluffy texture. |
| Sugar | Sweetness, Tenderness, Browning, Moisture Retention | Sugar is hygroscopic, meaning it attracts and holds onto water, which keeps baked goods moist. It tenderizes by inhibiting gluten development and competing with flour for water. It also contributes to browning through the Maillard reaction and caramelization. | Weighing sugar with a digital scale is far more accurate than measuring by volume. The way you pack brown sugar into a cup can dramatically alter the amount you use. |
| Eggs | Structure, Leavening, Richness, Emulsifying | Egg proteins coagulate (turn from liquid to solid) when heated, providing essential structure. Egg yolks add fat, which contributes to a rich flavor and tender texture. Yolks also contain lecithin, a natural emulsifier that helps create a smooth, stable batter. Whipped egg whites can act as a primary leavener by trapping large amounts of air. | Use room temperature eggs. They emulsify much better into the batter, creating a more uniform texture and better rise.25 To bring eggs to room temp quickly, place them in a bowl of warm tap water for 5-10 minutes. |
| Leaveners (Baking Soda/Powder, Yeast) | Rise, Lift, Lightness | Baking soda (NaHCO3) is a base that reacts with an acid (like buttermilk, yogurt, or lemon juice) in the presence of liquid to produce CO2 gas. Baking powder is a complete leavener, containing both baking soda and a powdered acid, so it only needs liquid and heat to react. Yeast is a microorganism that ferments sugars to produce CO2. | Baking soda and baking powder are not interchangeable. Always check that your leaveners are fresh; they lose potency after about 6 months of being opened, which can cause your bakes to be flat and dense. |
| Liquids (Milk, Water, Buttermilk) | Hydration, Steam, Flavor | Liquids hydrate the flour, which is necessary for both gluten development and starch gelatinization. They dissolve sugar and salt, distributing them evenly. During baking, liquid turns to steam, which also acts as a powerful leavening agent, helping the product rise. | The ratio of wet to dry ingredients is one of the most critical factors in determining the final texture of a baked good, from dense and fudgy to light and airy. |
| Salt | Flavor Enhancement, Structure | Salt is a crucial flavor enhancer, balancing sweetness and bringing out the nuanced flavors of other ingredients like chocolate and vanilla. It also strengthens the gluten network, allowing it to stretch and hold more gas without collapsing. In yeast breads, it helps regulate the rate of fermentation. | A baking recipe that doesn’t call for salt should be viewed with suspicion. It’s a sign that the recipe developer may not fully understand the science of baking. |
Heat and Transformation: The 10 Stages of Baking
To visualize how these ingredients and reactions come together, consider the sequential stages that a typical cake or bread undergoes in the oven:
- Fats Melt: Solid fats like butter melt, spreading through the batter and helping to tenderize the product.
- Gases Form: Leavening agents react to heat and moisture, producing bubbles of carbon dioxide gas.
- Gases are Trapped: The developing gluten network traps these expanding gas bubbles, causing the batter to rise.
- Microorganisms Die: Yeast and other microorganisms are killed by the heat.
- Starches Gelatinize: Starch granules in the flour absorb moisture and swell, setting the structure.
- Proteins Coagulate: Egg and flour proteins solidify, providing the final, stable structure of the baked good.
- Water Evaporates: Water turns to steam and escapes, helping to dry out the surface and form a crust.
- Sugars Caramelize: Sugars on the surface break down and brown, adding color and flavor.
- Maillard Reaction Occurs: The classic browning reaction takes place on the surface, creating deep, complex flavors.
- Carryover Baking: After being removed from the oven, the residual heat continues to cook and set the interior structure.
Gearing Up: The Essential Baking Toolkit
While a passionate baker can create wonderful things with just a bowl and a spoon, certain tools are essential for achieving consistent, professional-quality results. In baking, where precision is paramount, your equipment is not about luxury—it’s about removing variables and ensuring your scientific formula has the best possible chance of success.
The Non-Negotiables: Your Keys to Consistency
If you are serious about improving your baking, two inexpensive tools will have a greater impact than any fancy mixer or pan. They are the keys to accuracy and consistency.
- A Digital Scale: Professional bakers and pastry chefs measure ingredients by weight, not volume, for one simple reason: it is vastly more accurate. Measuring flour by volume using a cup is notoriously inconsistent. Depending on how you scoop or pack the flour, you can inadvertently add up to 30-40% more than the recipe calls for, leading to dense, dry, and tough baked goods.A digital scale eliminates this guesswork entirely. It also makes for easier cleanup, as you can measure multiple ingredients directly into your mixing bowl without dirtying a sink full of measuring cups.
- An Oven Thermometer: Most home ovens are not perfectly calibrated. The temperature you set on the dial can be off by 25°F or more, and many ovens have hot and cool spots. Baking a cake in an oven that’s too cool can cause it to be underbaked and sink in the middle, while an oven that’s too hot can burn the outside before the center is cooked. An inexpensive oven thermometer, placed on the center rack, is the only way to know the true temperature inside your oven, allowing you to adjust accordingly and eliminate one of the most common sources of baking failure.
Building Your Arsenal: A Guide to Essential Bakeware and Utensils
Once you have your scale and thermometer, you can build out your toolkit with other essential items.
- Measuring Tools: Even with a scale, you’ll need a set of measuring spoons for small quantities of ingredients like salt and spices. A liquid measuring cup, typically made of clear glass or plastic with a spout, is essential for accurately measuring liquids like milk and water.
- Mixing Tools: A set of mixing bowls in various sizes is a must. A good whisk is invaluable for combining dry ingredients and aerating mixtures, while a flexible rubber or silicone spatula is crucial for scraping the sides of the bowl to ensure everything is incorporated evenly. For more intensive tasks like creaming butter and sugar or kneading bread dough, a powerful stand mixer or a reliable hand mixer is a worthy investment.
- Bakeware: The quality of your pans matters. Invest in light-colored, heavy-gauge metal baking pans. Dark pans absorb more heat and can cause the bottoms and edges of your baked goods to burn, while flimsy pans can warp, leading to uneven baking. Be aware that glass or ceramic dishes conduct and retain heat differently than metal; they take longer to heat up but stay hot longer once out of the oven. If using a glass pan for a recipe that calls for metal, you may need to reduce the oven temperature by 25°F to prevent overbaking.
The Power of Parchment: The Pro’s Secret for Easy Release
One of the simplest yet most effective tools in a baker’s arsenal is parchment paper. Lining your cake pans and cookie sheets with parchment is a game-changer. It creates a non-stick surface that guarantees your baked goods will release cleanly every time, preventing the heartbreak of a cake stuck to the pan. It also makes cleanup incredibly easy and allows you to lift an entire batch of brownies or bar cookies out of the pan in one piece for neat, perfect slicing.
Mastering the Craft: Fundamental Techniques for Every Baker
Baking techniques are the physical processes used to achieve specific chemical results. When you cream butter and sugar, you’re not just mixing; you’re creating an aerated structure. When you fold in flour, you’re not just combining; you’re preserving that structure. Understanding the purpose behind each action is the bridge between following a recipe and mastering the craft.
The Foundations: 10 Commandments for Beginner Success
For those new to baking, adhering to a few fundamental rules can dramatically increase your success rate and help you build a strong foundation of good habits.
- Read the Entire Recipe First: Before you touch a single ingredient, read the recipe from start to finish. This helps you understand the entire process and ensures you have all the necessary ingredients and equipment on hand.
- Practice Mise en Place: This French term means “everything in its place.” Measure out all your ingredients and have them ready to go before you begin mixing. This prevents frantic searching for an ingredient mid-process and ensures time-sensitive steps are carried out properly.
- Respect Temperature: When a recipe calls for room temperature ingredients like butter, eggs, or milk, heed the advice. These ingredients emulsify (blend together) far more effectively when they are at a similar temperature, resulting in a smooth, uniform batter and a better final texture. Conversely, never add a hot ingredient (like melted butter) to a cool batter, as it can scramble eggs or curdle dairy.
- Weigh, Don’t Scoop: As emphasized before, use a digital scale for dry ingredients. It is the single most important step for accuracy.25 If you must use volume cups, use the “spoon and level” method: use a spoon to lightly fill the measuring cup, then sweep the excess off with the back of a knife. Never dunk and scoop directly from the flour bag.
- Don’t Make Substitutions (At First): A well-tested recipe is a carefully balanced chemical formula. As a beginner, resist the urge to swap ingredients. Follow the recipe precisely to understand how it’s supposed to work before you start experimenting.
- Follow the Order of Operations: The sequence in which ingredients are added is not arbitrary. It is designed to build structure and texture correctly, such as creaming fat and sugar first to create air pockets before adding eggs.
- Don’t Rush the Process: Baking requires patience. Rushing often leads to mis-measured ingredients, skipped steps, and disappointing results. Give yourself plenty of time to enjoy the process.
- Keep the Oven Door Closed: Every time you open the oven door, the temperature can drop significantly. This fluctuation can cause cakes and other delicate bakes to fall flat. Trust your oven light and window, and only open the door when you believe the item is truly done.
- Prep Your Pans Properly: Even if you have non-stick pans, always take the extra step to grease and flour them, or line them with parchment paper. It’s cheap insurance against sticking.
- Let It Cool Correctly: Most baked goods are still fragile when they first come out of the oven. Allow them to cool for a few minutes in the pan before transferring them to a wire cooling rack. This allows air to circulate all around, preventing the bottom from becoming soggy and ensuring the internal structure sets properly.
Level Up: Key Professional Techniques Explained
Once you’re comfortable with the basics, you can focus on mastering techniques that will elevate the quality of your baked goods.
- Creaming: This is the process of beating solid fat (like butter) with sugar until the mixture is light and fluffy. The purpose is mechanical leavening. The sharp edges of the sugar crystals cut into the fat, creating thousands of microscopic air pockets. These pockets trap the gas released by leavening agents, resulting in a fine, tender crumb in cakes and cookies.
- Folding: This gentle technique is used to incorporate a light, airy ingredient (like whipped egg whites or whipped cream) into a heavier batter without deflating it. Using a large spatula, you cut down through the middle of the mixture, scrape along the bottom, and gently “fold” the batter from the bottom up and over the top. You turn the bowl a quarter turn and repeat until just combined.
- Cutting In: Essential for flaky pastries like pie crusts, biscuits, and scones, this technique involves working solid, cold fat into flour. The goal is not to fully combine them, but to leave small, pea-sized or thumbnail-sized pieces of fat coated in flour. During baking, these pieces of fat melt, and the water in them turns to steam, pushing the layers of dough apart and creating a tender, flaky texture.
- Laminating: This is an advanced technique used to create the incredibly flaky, layered structure of pastries like croissants, danishes, and puff pastry. It involves enclosing a large block of cold butter within a lean dough and then repeatedly rolling and folding the dough. This process creates hundreds or even thousands of alternating micro-layers of dough and butter. When baked, the butter melts and creates steam, forcing the dough layers apart into a light, airy, and shatteringly crisp pastry.
Baking vs. Roasting and Other Methods: Choosing the Right Technique
Understanding the subtle but critical differences between various cooking methods empowers you to choose the optimal technique for any ingredient. Baking is part of the Roasting family, but how does it differ from its cousins? This knowledge not only makes you a better cook but also helps you navigate the world of recipes with greater understanding.
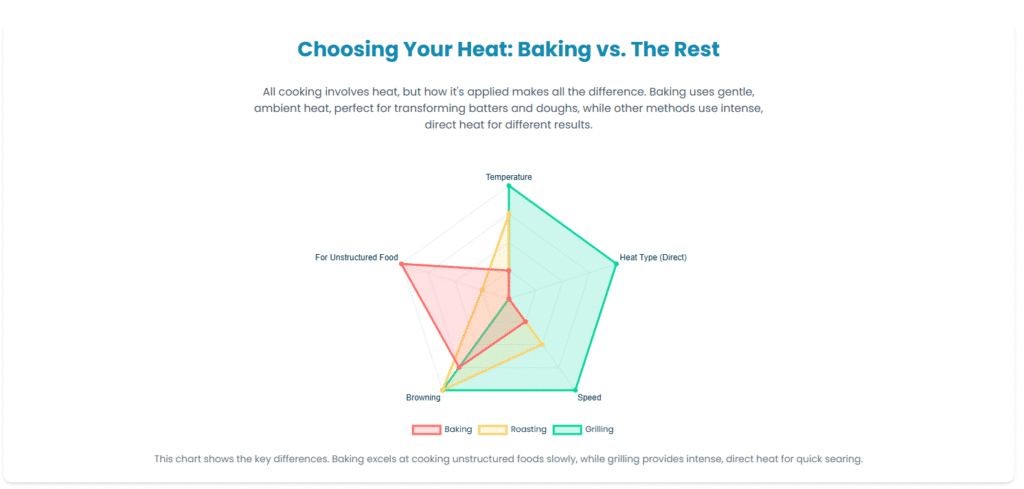
Baking vs. Roasting: It’s All About Structure and Temperature
While baking and roasting both use the dry, ambient heat of an oven, they are applied differently for different purposes. The key distinction lies in the food’s initial structure and the oven temperature.
- Baking is typically done at moderate temperatures (around 300°F to 375°F) and is used for foods that start without a solid structure, like liquid batters (cakes, muffins) and soft doughs (bread, cookies). The slower, gentler heat allows the item to cook through and set its structure from the inside out.
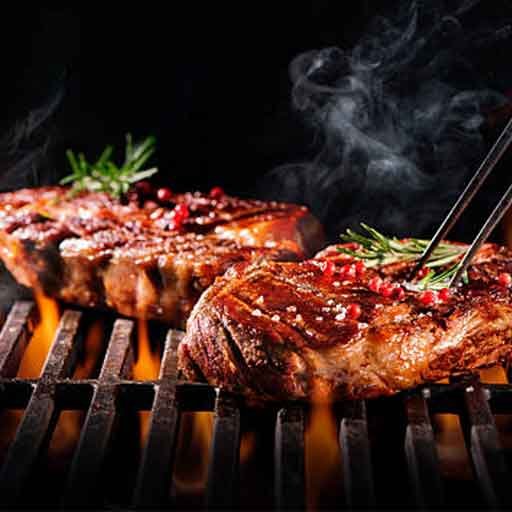
- Roasting is used for foods that already have a solid structure, such as large cuts of meat, whole poultry, and hearty vegetables. It employs higher temperatures (400°F and above) to create a deeply browned, caramelized, and flavorful crust on the outside while cooking the interior. You bake a cake, but you roast a chicken.
Baking vs. Grilling and Broiling: Ambient vs. Direct Heat
The way heat is delivered is another crucial difference. Baking relies on indirect, ambient heat.
- Baking cooks food by surrounding it with hot air that circulates within the oven.
- Grilling and broiling are direct-heat methods. Grilling applies intense, radiant heat from below (from charcoal or gas burners), while broiling applies intense, radiant heat from above (from the oven’s top heating element). This direct heat is designed for quick cooking and creating a significant char or sear on the surface of foods like steaks, burgers, and thin vegetable slices.
A World of Difference: Dry Heat vs. Moist Heat Cooking
Finally, it’s important to distinguish the entire category of dry-heat cooking from its opposite.
- Baking, roasting, and sauteing, rely on hot air or fat to transfer heat and are known for producing rich flavors through browning reactions like Maillard and caramelization.
- Moist Heat Cooking Methods, in contrast, use water, steam, or a water-based liquid as the primary cooking medium. Methods like [steaming] and [poaching] cook food gently without browning, which often results in a different texture and can preserve certain water-soluble nutrients that might be lost in other methods.
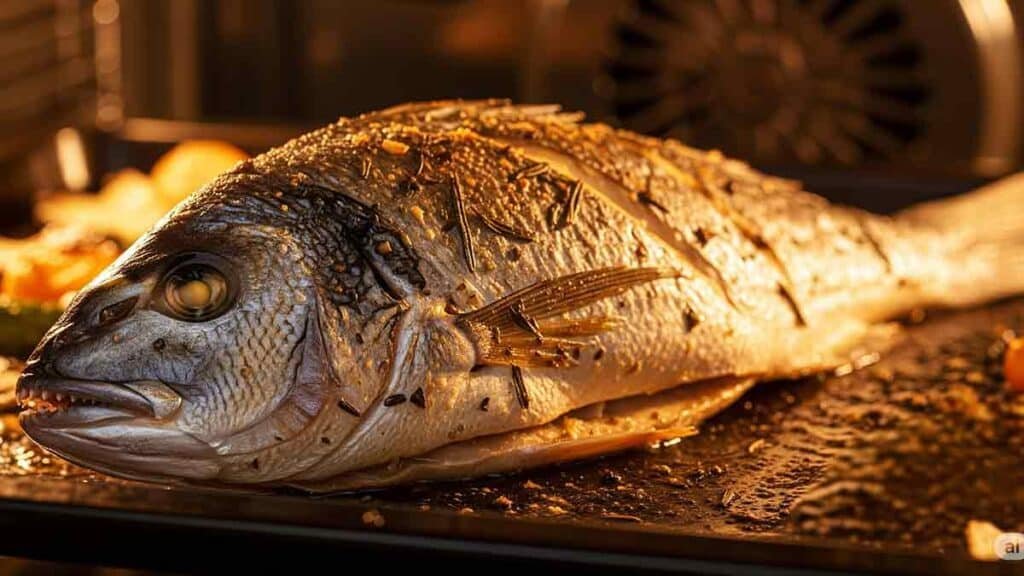
The Fishmonger’s Oven: A Complete Guide to Baking Fish
Baking is a wonderfully gentle and flavorful way to cook fish, a perfect match for the delicate nature of most fillets. The even, ambient heat of the oven cooks the fish through without the harsh, direct contact of a hot pan, making it less likely to dry out or fall apart. This section provides a complete guide to bringing the best of the sea to your oven.

Choosing Your Catch: The Best Fish for Baking
While most fish can be baked, certain types are particularly well-suited for this method. Generally, you want to look for flaky white fish, which are mild-flavored and cook relatively quickly. Thicker fillets, about 1-inch thick, are often ideal as they are more forgiving and less prone to overcooking.
Excellent choices for baking include:
- Cod
- Halibut
- Tilapia
- Haddock
- Snapper
- Grouper
- Salmon and Trout also bake beautifully, offering a richer flavor.
You can use either fresh or frozen fillets. If using frozen, it’s best to thaw them completely overnight in the refrigerator and pat them very dry with paper towels before seasoning to remove excess moisture.
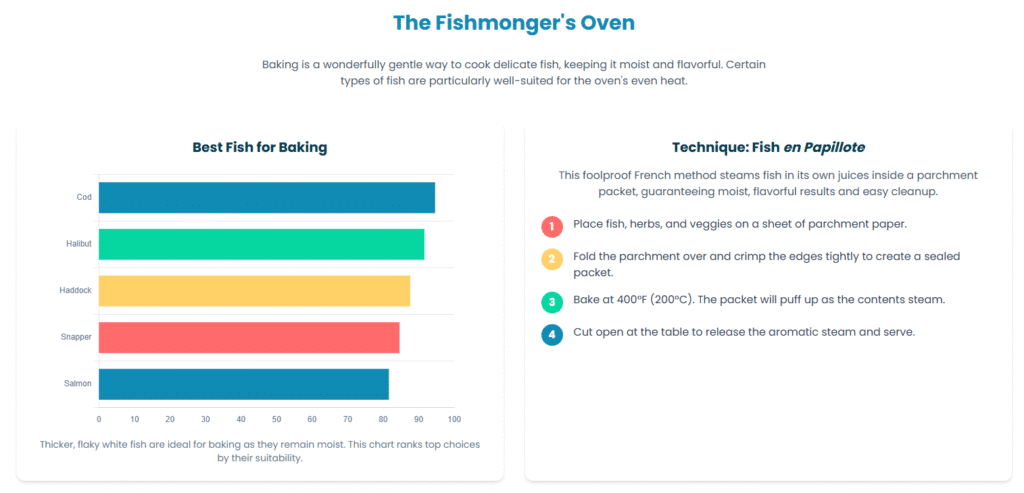
Technique Spotlight: Perfect Fish en Papillote (in Parchment)
One of the most elegant and foolproof methods for baking fish is en papillote, a French term that means “in parchment”. This technique involves creating a sealed packet out of parchment paper, enclosing the fish along with vegetables, herbs, and a little liquid or fat, and then baking it.
The science behind this method is what makes it so brilliant. The dry heat of the oven heats the packet from the outside, while the moisture from the fish and vegetables inside turns to steam. This steam gets trapped within the sealed packet, gently cooking the fish and infusing it with all the flavors of the other ingredients. This process effectively creates a personal steamer inside your oven, making it a perfect example of a
The benefits are numerous:
- Incredibly Moist Fish: The steam environment makes it almost impossible to overcook or dry out the fish.
- Intense Flavor: All the aromas from the herbs, citrus, and vegetables are sealed in, deeply flavoring the fish.
- Easy Cleanup: You cook and can even serve the fish in the parchment packet, meaning there are no messy pans to scrub.
- Beautiful Presentation: Opening the fragrant parchment packet at the table feels like unwrapping a delicious present.
Simple Lemon-Herb Baked Fish Recipe (A Great Starting Point)
For a straightforward introduction to baked fish, this foundational recipe is perfect. It’s quick, easy, and endlessly adaptable.
Yields: 4 servings
Prep time: 10 minutes
Cook time: 12-15 minutes
Ingredients:
- 4 (6-ounce) white fish fillets, such as cod or halibut
- 3 tablespoons unsalted butter, melted (or olive oil)
- 2-3 cloves garlic, minced
- 1 tablespoon fresh lemon juice
- 2 tablespoons chopped fresh herbs (such as parsley, thyme, or dill)
- Kosher salt and freshly ground black pepper, to taste
- 1 lemon, thinly sliced, for garnish
- Optional: A bed of quick-cooking vegetables like asparagus spears or sliced zucchini
Instructions:
- Preheat your oven to 400°F (200°C). Lightly grease a 9×13-inch baking dish or line it with parchment paper.
- Pat the fish fillets completely dry with a paper towel and season both sides with salt and pepper. Arrange them in a single layer in the prepared baking dish. If using vegetables, arrange them around the fish.
- In a small bowl, whisk together the melted butter, minced garlic, lemon juice, and chopped fresh herbs.
- Pour the lemon-herb butter evenly over the fish fillets.
- Bake for 12-15 minutes, or until the fish is opaque and flakes easily with a fork. The exact time will depend on the thickness of your fillets.
- Serve immediately, garnished with fresh lemon slices.
When Bakes Go Bad: Your Ultimate Troubleshooting Guide
Even the most seasoned bakers face the occasional failure. A sunken cake, a dense loaf, or a cracked cookie can be frustrating, but these problems are rarely random. They are symptoms of an underlying imbalance in the baking science. By learning to diagnose the issue, you can turn a baking flop into a valuable lesson and fix it the next time. Most common issues can be traced back to three areas: ingredient measurement, oven temperature, or mixing technique.
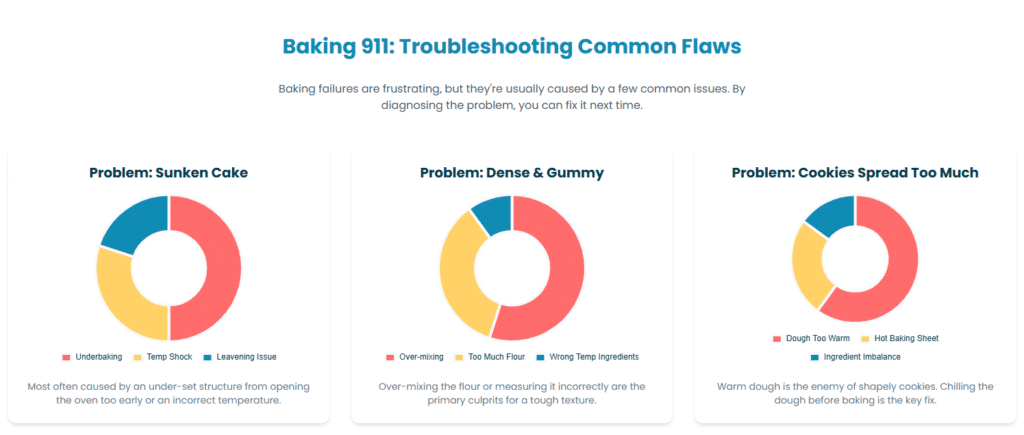
Table: Baking 911: Your Troubleshooting Guide
| Problem | Visual Cues | Likely Causes | How to Fix It | ||||
| Cake Sank in the Middle | A dramatic dip or crater in the center of the cake, which is often dense, wet, or gummy. | Underbaking: The cake’s structure didn’t have time to set before being removed. This is often due to an oven temperature that is too low. | Temperature Shock: Opening the oven door too early or slamming it can cause the delicate, rising structure to collapse. | Leavening Issues: Using expired baking powder/soda, or using too much, which causes the cake to rise too fast and then fall. | Verify Oven Temp: Use an oven thermometer to ensure accuracy. | Be Patient: Resist the urge to open the oven door until the final few minutes of baking. | Check & Measure: Test your leaveners for freshness and always measure them precisely. |
| Dense, Gummy, or Heavy Texture | The crumb is tight and not tender. It may have a gummy streak or feel heavy and leaden. | Over-mixing: Once flour is added, over-mixing develops too much gluten, resulting in a tough, dense texture instead of a tender one. | Too Much Flour: Inaccurate measurement (scooping instead of weighing) is the most common culprit. | Wrong Temperature Ingredients: Using cold butter or eggs can prevent proper emulsification, leading to a heavy batter. | Mix Just Until Combined: When adding dry ingredients, mix on low speed only until the last streaks of flour disappear. | Weigh Your Flour: Use a digital scale for the most accurate measurement. | Use Room Temperature Ingredients: Let butter, eggs, and dairy sit out for 30-60 minutes before starting. |
| Dry and Crumbly | The cake or bread has visible cracks on top and a dry mouthfeel. | Over-baking: The most common reason. Even a few extra minutes can dry out a bake. | Oven Too Hot: The exterior cooks and dries out long before the interior is done. | Ingredient Imbalance: Too much flour or not enough fat or liquid in the recipe. | Check for Doneness Early: Start checking a few minutes before the recipe’s stated time. | Calibrate Your Oven: Use an oven thermometer to check for hot spots or inaccuracies. | Measure Accurately: Weigh your ingredients to ensure the proper ratio of dry to wet components. |
| Cookies Spread Too Much | Cookies bake into thin, flat, greasy discs instead of holding their shape. | Dough is Too Warm: The fat in the dough was too soft before it went into the oven, causing it to melt and spread instantly. | Too Much Sugar or Fat: An excess of these ingredients can weaken the dough’s structure. | Hot Baking Sheet: Placing dough on a hot pan from a previous batch will cause it to start melting immediately. | Chill the Dough: For most drop cookies, chilling the scooped dough for at least 30 minutes before baking makes a huge difference. | Measure Accurately: Weigh your ingredients. If the problem persists, try reducing the sugar slightly. | Cool Your Pans: Always let baking sheets cool completely to room temperature between batches. |
Baking on Top of the World: A Note on High-Altitude Adjustments
Baking at high altitudes (generally considered 3,000 feet above sea level and higher) presents a unique set of challenges. It’s not that the rules of baking change, but the environment itself does, requiring you to recalibrate your recipes to account for the difference in air pressure.
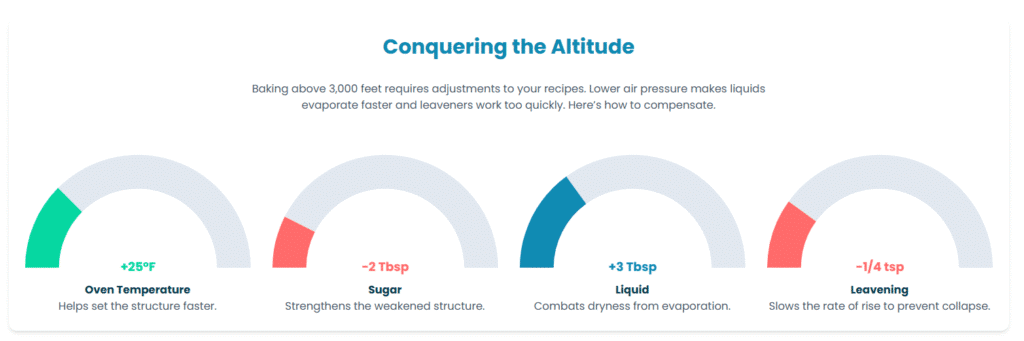
Why is High-Altitude Baking Different?
The primary challenge at high altitudes is the lower atmospheric pressure. This thinner blanket of air affects baking in two major ways:
- Leavening Gases Expand More Easily: With less air pressure pushing down on them, the gases produced by baking soda, baking powder, and yeast expand more quickly and with more force. This can cause cakes and breads to rise too rapidly before their internal structure has had a chance to set, leading to a dramatic collapse.
- Liquids Evaporate Faster: The lower air pressure also means that water boils at a lower temperature and liquids in your batter evaporate more quickly. This can lead to dry, crumbly baked goods and can also cause the sugar in your recipe to become overly concentrated, which weakens the structure.
Your High-Altitude Adjustment Cheat Sheet
To counteract these effects, you need to make small but crucial adjustments to your recipes. It’s always best to try one adjustment at a time. The following table provides a starting point for baking above 3,000 feet.
Table: High-Altitude Baking Adjustments
| Adjustment | Change | Why It Works |
| Oven Temperature | Increase by 15°F to 25°F | A hotter oven helps to “set” the structure of the baked good more quickly, before the leavening gases can cause it to over-expand and collapse. |
| Baking Time | Decrease by 5-8 minutes per 30 minutes of baking | Because the oven is hotter, the food will bake faster. Start checking for doneness earlier than the recipe suggests. |
| Sugar | Decrease by 1-3 tablespoons per cup | This compensates for the higher sugar concentration caused by rapid moisture evaporation, which helps strengthen the final structure. |
| Liquid | Increase by 2-4 tablespoons per cup | Adding extra liquid (water, milk, or even an extra egg) counteracts the drying effect of increased evaporation, keeping the final product moist. |
| Leavening (Baking Powder/Soda) | Decrease by 1/8 to 1/4 teaspoon per teaspoon | This reduces the amount of leavening gas produced, slowing the rate of rise and giving the cake’s structure time to form properly before it sets. |
Conclusion: Your Baking Adventure Awaits
Baking, in all its flour-dusted glory, is one of the most rewarding kitchen skills you can develop. It is a beautiful blend of precise science and creative art, a practice where understanding the rules of chemistry unlocks the freedom to create. We’ve journeyed from the ancient hearths where the first breads were made to the modern oven, demystifying the reactions that turn simple dough into a golden-brown masterpiece. The key takeaways are simple but powerful: precision is your friend, understanding the “why” behind a technique is transformative, and every bake—even a failed one—is a valuable lesson.
The adventure is now yours to begin. Start with a simple, forgiving recipe, like the classic chocolate chip cookie or the lemon-herb baked fish detailed in this guide. Embrace the process, be patient with yourself, and enjoy the delicious results of your newfound knowledge.
Ready to bake with the precision of a pro? A digital scale is your best friend, but our calculators are your secret weapon. Convert any recipe’s volume measurements to precise weights with our Ingredients Weight to Percentage Calculator. Or, if you’re developing your own recipes, master your ratios with the Ingredients Percentage to Weight Calculator. These tools, complete with visualizations, printable reports, and shopping list features, are designed to help you remove the guesswork and achieve perfect, consistent results every time. Happy baking!